This page is obsolete. We keep it only for archival purposes. This design was a failure, for the reasons explained in the updates at the end of the post. For a much better design (version 2) see THIS.
For petanque players with back issues, a magnetic boule lifter can be a life-saver. You can buy one on the web, or you can make your own.

TOOLS
We’re going to be using epoxy putty, so you will need some tools to shape the putty after it has set. You can use a small file, some rough sandpaper, or a dremel tool. A knife will also be handy.
MATERIALS
All of the materials should be available at your local hardware store. When I did this project in June 2021 in Tucson, Arizona, the total cost of materials was between $15 and $20. You will need—
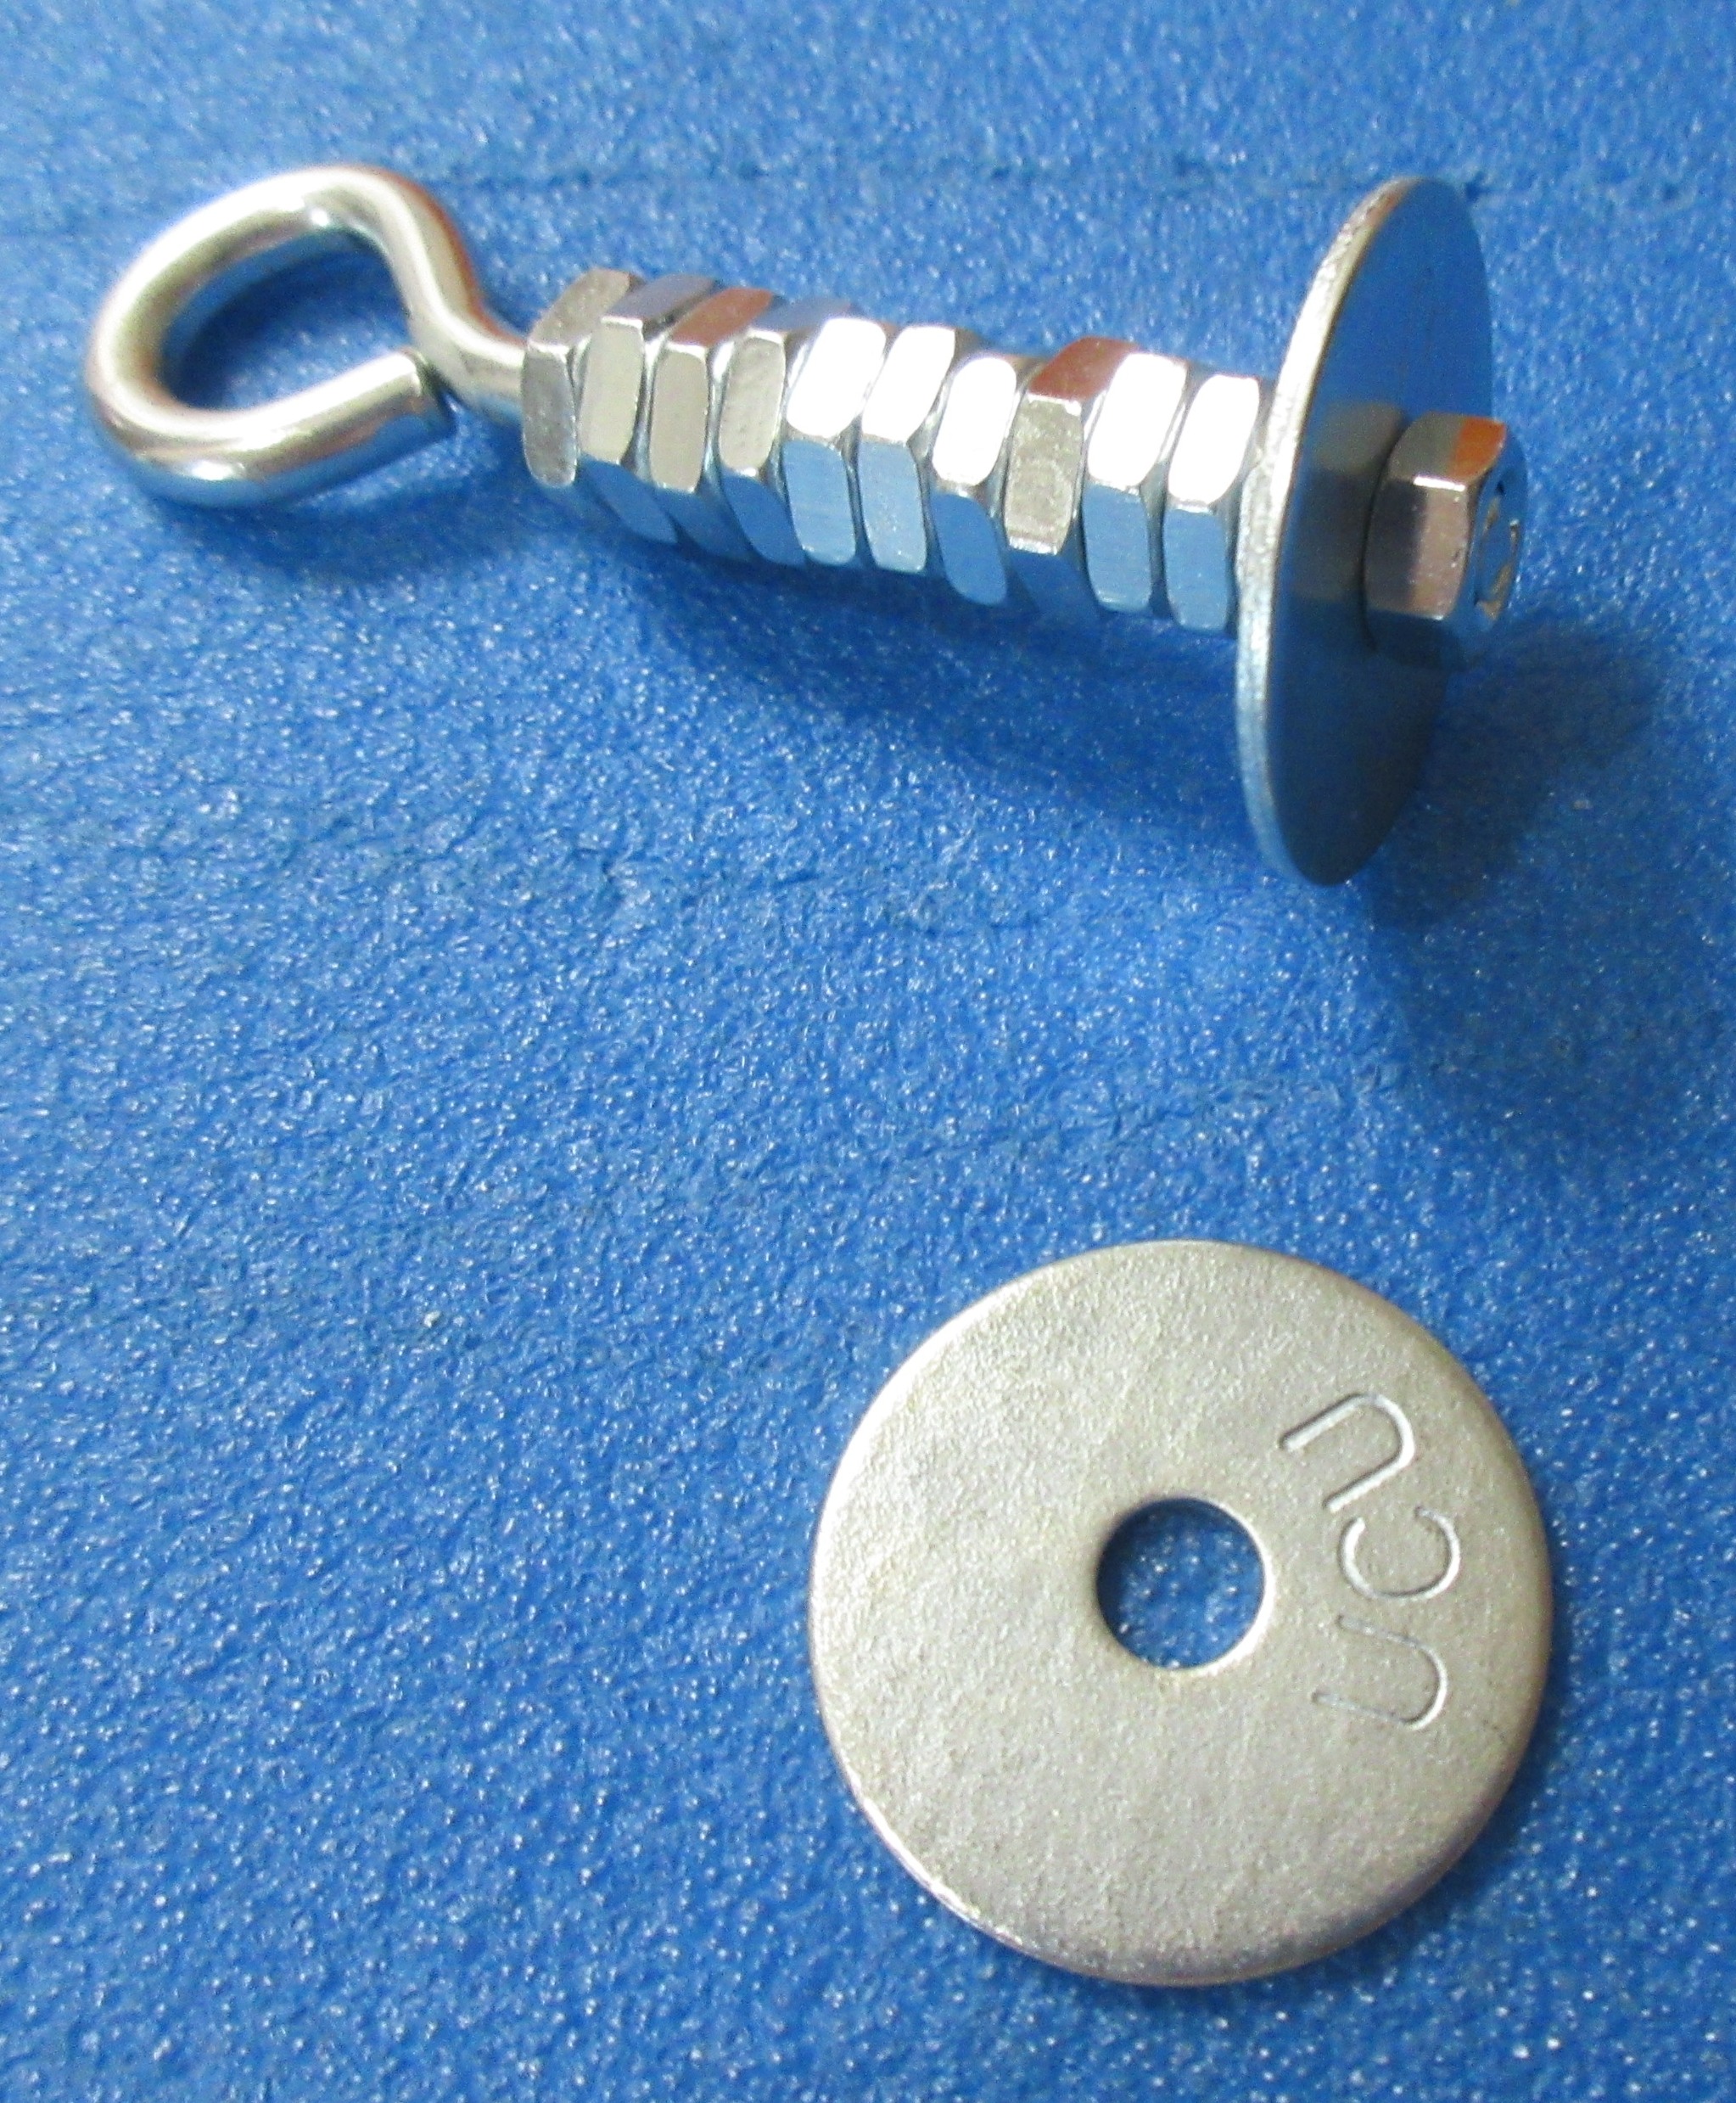
- One eye bolt with a diameter of 3/16″ or 1/4″ and a length of 2.5 inches.
- Enough nuts to fill all the threads of the eye bolt, probably about 12 nuts.
- Two one-inch fender washers. The diameter of the hole in the washers should be the same as the diameter of the eye bolt.
- One nickle-sized neodymium disc magnet (18mm in diameter and 3mm thick). A 3-pack cost me $6.60 at my local hardware store.
- Epoxy putty or gel. About $8 at my local hardware store.


ASSEMBLING THE LIFTER
The first step is to tightly screw enough nuts onto the bolt almost to fill its entire length.

Add one of the washers and tightly screw on a nut so that it holds the washer in place and the end of the bolt doesn’t protrude out past the nut.
Cut off a small chunk of epoxy putty and knead it in your hands to mix the two epoxy components. The putty will start to set up very quickly— within two or three minutes— so work only with small amounts of putty and work quickly. Later, if you need more, you can add more.
Take a small amount of the epoxy putty. Roll it out to get a short length of putty, then wrap the putty around the last nut like a donut.

Press the second washer onto the putty, so the two washers make a putty “sandwich”. Push down hard on the washer to make sure that is pressing against the nut. Some putty will squish out of the sides. If necessary, push extruded putty back between the washers, so the space between the washers is completely filled with putty. Make sure that the second washer is centered and in line with the first washer.

Stand the whole assembly on its “face”, with the handle up, so you can check that the second washer isn’t tilted. If the putty is still fairly soft, try to use a knife to cut down and trim off excess putty from around the washers. This is not absolutely essential, but if you can do it, it will save you some cleanup work later.
Let the epoxy sit so that it has time to cure. An hour should do it, but check the instructions on the package. Once the epoxy has hardened, the washer/putty sandwich will make a solid base for the magnet.

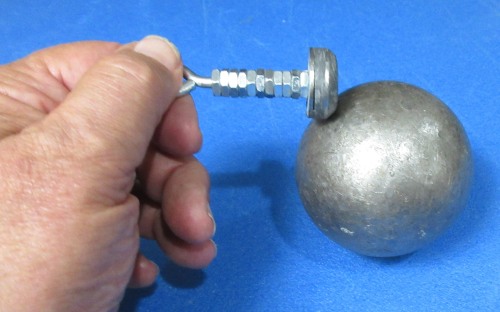
Take enough putty to make a ball a little bit bigger than the magnet. Place the ball of putty in the center of the second washer. Place the magnet on the ball of putty and push the magnet as hard as you can down onto the washer. Putty will squish out around the sides of the magnet. You want that to happen, because you’re going to use that squished-out putty. (Ideally, we want putty to squish out all the way to the edge of the washer. I made the mistake of not using enough putty, and as you can see in this picture, the squished-out putty didn’t reach the edge of the washer. After I took this picture, I had to quickly add some more putty around the edge of the magnet.)

Now you need to work quickly. You want to create a continuous ring of putty around the magnet, filling the space between the edge of the magnet and the edge of the washer. If you need to, gently push the squished-out putty into place. If there is any putty on the face of the magnet, push it away so that the face of the magnet is completely exposed. Gently push down any high bumps of putty around the face of the magnet.

Give the epoxy time to cure. When it has hardened, you will have a working boule-lifter, but it will be ugly.

Take your file/sandpaper/dremel tool and sand down the epoxy around the magnet. You want to shape the putty so that it forms a rounded shoulder around the magnet.


At this point you’ve finished the most difficult part of the project. The rounded shoulder of epoxy supports and protects the edge of the magnet. It also makes it easier for you to tip the magnet over and lift it away from a picked-up boule.
When you attach a cord and a ring, your lifter will be ready to use. Note that I say “cord”, not “string”. Strings are strong enough to do the job, but they get tangled easily because they are so thin and flexible. Something thicker and stiffer — a cord— won’t tangle so easily. See the picture below.
Select a metal ring that can be grabbed by the magnet. That way you can wear the lifter like a necklace when you’re not using it. An ordinary round split metal key ring works well. A bit classier is a “welded ring” like the one in the picture, which I got at my local hardware store for $1.60.

The boule lifter is now ready to be used. There is a photo of the finished product at the top of this page.
Neodymium magnets are brittle. This design, like commercial boule lifters, provides good support for the back and sides of the magnet, so I expect it to be as durable as any commercial boule-lifter. Over the next few months I will use it regularly and report on what I find.
Originally posted June 22, 2021
UPDATE
September 22, 2021
After 3 months (80 hours) of regular use, the epoxy collar around the magnet suddenly and completely broke away. It looks like there was poor adhesion between the epoxy putty of the collar and the zinc-coated washer to which it was attached. I made a new collar using a traditional clear epoxy gel, which I think might hold onto the washer better than the epoxy putty that I originally used. To be on the safe side, I also slopped a little extra epoxy onto the sides of the lifter.
March 31, 2022
After 6 months of regular use, the epoxy collar around the magnet broke and began to peel away. Again, there seemed to be poor adhesion between the epoxy gel washer and magnet. In addition, cracks in the epoxy suggest that epoxy might be too brittle for this application. Recreating the epoxy collar every 6 months is an option of course, but I will look for a more “rubbery” adhesive for the collar, which might be able to flex rather than break. It’s clear that the best solution (which is what other boule lifters use) would be to counter-sink the magnet in a strong plastic or metal enclosure of some sort. I’ll investigate that option also.
![]()
