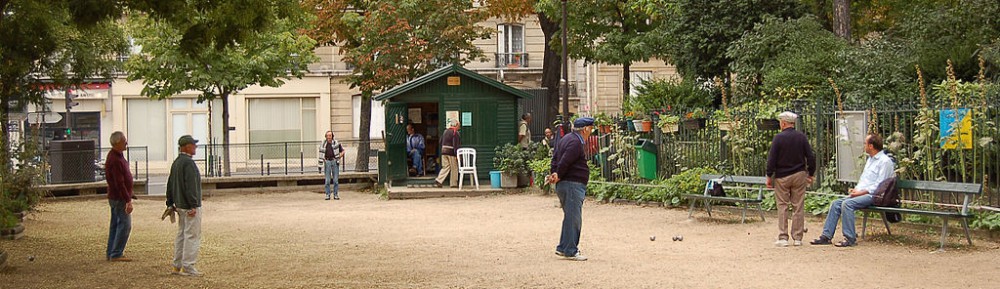
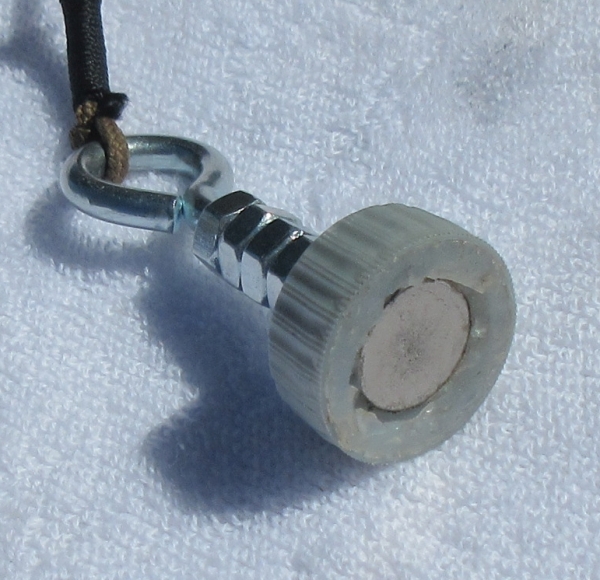
For petanque players with back issues, a magnetic boule lifter can be a life-saver. You can buy one on the web, or you can make your own. This design for a home-made lifter is actually better than some of the ones you see for sale on the web. MATERIALS
All of the materials should be available at your local hardware store. When I did this project in April 2022 in Tucson, Arizona, the total cost of materials was between $15 and $20. You will need—
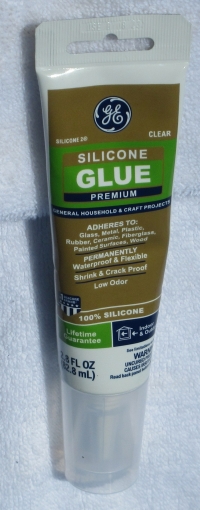
Silicon glue. About $8 at my local hardware store.
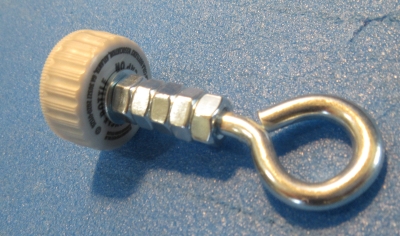
One eye bolt with a diameter of 1/4″ and a length of about 2.5 inches. Enough nuts (probably around 6 or 7) to fill all the threads of the eye bolt. Two small washers with a 1/4″ hole. And a plastic bottle cap from a bottle of soda.
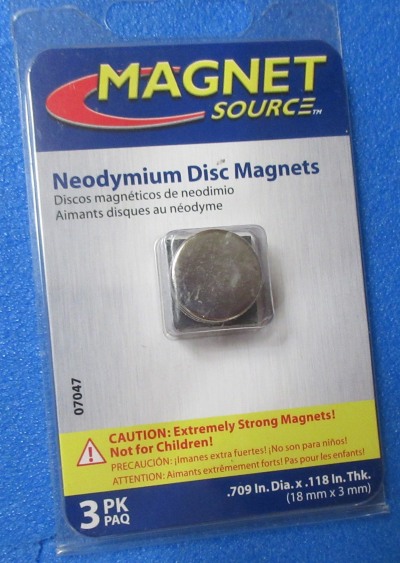
One nickle-sized neodymium disc magnet (18mm in diameter and 3mm thick). A 3-pack cost me $6.60 at my local hardware store.
ASSEMBLING THE LIFTER
Drill a 1/4″ hole in the center of the bottle cap, so that it can be threaded onto the eye bolt.
Tightly screw enough nuts onto the bolt almost to fill its entire length.
Add one washer, then the bottle cap, then the other washer.
Finally, screw a nut tightly on to the end of the eye bolt so that it holds everything together.
Note that the end of the bolt doesn’t protrude out past the nut.
At this point you can place the magnet on the nut and see where it will be located when the project is complete.
Note that the magnet is positioned slightly below the edges of the bottle cap. That’s good. The magnet will be well protected.
Squirt a thin layer of silicon glue onto the nut.
Fill the area around the nut with more silicon glue, so the nut looks like an island in a sea of silicon.
Position the magnet on top of the nut and push it down firmly, so that it is glued to the nut.
The final step is to fill the area around the magnet with more silicon glue, right up to the edges of the bottle cap. The goal here is to create a rubbery silicon buffer around the magnet. The silicon buffer will protect the edges of the magnet, and the edges of the bottle cap, in turn, will protect the silicon buffer.
If there is any glue on the face of the magnet, wipe it off with a paper towel so that the face of the magnet is clean. Gently smooth out any bumps or irregularities in the silicon glue around the magnet.
Set the lifter aside to give the silicon glue time to cure. Since we’ve slathered on the glue in great dollops rather than using it as a thin layer of adhesive, allow extra time for it to cure. When it has cured, you will have a working boule-lifter.
Attaching a cord
When you attach a cord and a ring, your lifter will be ready to use. Note that I say “cord”, not “string”. Strings get tangled easily because they are thin and flexible. Something thicker and stiffer— a cord— won’t tangle so easily. For another boule lifter I used a light cotton cord (see picture below). In this project I used a heavy boot lace.
Select a metal ring that can be grabbed by the magnet. (That way you can wear the lifter like a necklace when you’re not using it.) A split metal key ring works well enough, but I prefer a nice “welded ring” (like the one in this picture) which I got at my local hardware store for $1.60.
The boule lifter is now ready for use. There is a photo of the finished product at the top of this page.
This is actually our second design for a magnetic boule lifter. Our first version used galvanized steel washers and epoxy glue (rather than a plastic bottle cap and silicon glue) to support and protect the magnet. It worked well, but didn’t last very long. The epoxy had difficulty sticking to the smooth flat surface of the steel washers, and it was so brittle that it cracked and broke away after about three months of use. I think that this design will solve those problems. Over the next few months I will use it regularly and report on what I find. [2022-04-02]
Can I use this set of boules in an FIPJP-sanctioned competition?
How can I tell whether this is a leisure boule or a competition boule?
When you have such a question, look at two things.
Look at the packaging
If you just bought a new set of boules, or are thinking about buying a new set of boules, look at the packaging. The packaging of a set of competition boules will display the FIPJP’s V-shaped, rainbow-colored logo and the words boules homologuées (“certified boules”) or some variation on those words— boules de compétition homologuées— homologué en compétition par la FIPJP— agréés par la FIPJP en compétition.
If you don’t see those words or the FIPJP logo, the boules are not competition boules.
Note that manufacturers often sell both competition boules and leisure boules, so the name of a reputable French manufacturer does not mean that the boules are competition boules. If the packaging does not display the FIPJP logo and the “certified” label, the boules are not competition boules. These classic JB boules look great… but they are not competition boules.
If you’ve bought a set of used boules on eBay, be alert. Look at the boules themselves and don’t trust the packaging. I’ve seen leisure boules offered on eBay in a cardboard box that originally contained competition boules.
Look at the boules
How can you tell— by looking at a boule— whether or not it is a competition boule?
First, look for indicators that it is a leisure boule.
If the boule is marked with the phrase “Made in France”, it is a leisure boule.
A very bright, shiny chrome finish, along with rounded (rather than crisply-cut) edges on grooves, is the hallmark of an inexpensive Chinese-made leisure boule.
Other hallmarks of inexpensive Chinese-made leisure boules include— packaged in a soft-sided bag (containing 3, 6, or 8 boules) that includes a small jack and a measuring string with two plastic ends. Typically the bag is marked with a single word— “petanque” or “boules” or “bocce”.
If that doesn’t answer the question, look for indicators that it is a competition boule. Competition boules are required to display three pieces of information.{1}
the manufacturer’s name (or logo) and the name (or logo) of the model of boule.
the weight (poids) of the boule in grams. This is a number between 650 and 800.
a set identifier. This is a combination of letters and/or numbers that uniquely identifies a particular set of boules. All of the boules in the set will have the same ID.{2}
A boule that is missing any any of these required marking is not a competition boule and may not be used in an FIPJP-sanctioned competition.{3}{4}
Note that a competition boule may contain other markings as well. La Franc stamps their boules with the size (diamèter) of the boule. MS Petanque boasts that the complete markings on its boules give you all of the information about the boule, including the year it was manufactured (l’année de fabrication). And of course a previously-used set of boules may be stamped with the name or initials of its original owner.
The bottom line
The bottom line is that the ultimate test for whether or not a boule can be used in an FIPJP-sanctioned competition is the presence or absence of all three of the pieces of information that are required to be stamped onto all FIPJP-certified boules.
{2} Some boule manufacturers occasionally sell— at steeply discounted prices— sets of competition boules that have mis-matched IDs. Note that such boules are allowed in competitions. FIPJP rules require that all of a player’s individual boules must be certified, but not that they must all come from the same set.
{3} Note that not every boule without these marking is a leisure boule. Very rarely, a boule without the required markings is a good-quality French boule manufactured before 1974, when the FFPJP first began requiring markings on competition boules. Still, without the required markings, such older boules may not be used in FIPJP-sanctioned competitions.
{4} Note that “open” competitions (such as the Amelia Island Petanque Open, in Florida) often have no requirements about the kind of boules the participants use.
There is a new product on the market— the “petanque mat” (tapis de pétanque or tapis de lancement). It is a 50cm circular piece of vinyl polymer (rubber). It is 3mm thick. You place it on the ground like a plastic circle, and when you throw, you stand ON it rather than IN it.
It is manufactured by a Franch company, Tapis de Pétanque (tapisdepetanque.com/). Their web site says that these petanque mats were approved by the FIPJP in 2019, and they put a stamp on the mats to prove it. (I haven’t found anything on the FIPJP website that documents or announces this approval… but then the FIPJP said nothing a few years ago when it approved OBUT’s paramagnetic “black jack”.)
The mat comes in a plain black “classic” design (above) for about €20 and a slightly thicker (4mm) “luxe” version. The luxe version comes in a variety of preprinted designs for about €70, and you can have one printed with a custom design for around €140.
The touted benefits of the mat are that it can be rolled up, making it more portable than a plastic circle; it is comfortable to stand on; you can’t trip on the edge when stepping off of it; a player standing on it cannot move it; and it causes no disturbance of the ground that needs to be repaired at the end of the mène. I think we have to take those claims with a few grains of salt. It’s still possible, of course, to trip on the edge when stepping ON to the mat. And it is possible to kick and move the mat when you aren’t actually standing on it, so you still must mark it.
I think it is a neat idea, but for manufactures and vendors of petanque equipment, not for players. Basically, it is just another platform for advertising. In the future we may start to see mats with OBUT logos in televised championships, but for everyday grass-roots games nobody is going to spend €140, or €70, or even €20 on a mat when they can get a perfectly serviceable plastic circle from Decathlon for $7.
One consequence of these mats— assuming that the FIPJP now really does recognize/approve the use of mats as well as plastic circles — might be that grassroots players will begin cutting 50cm circles out of pieces of carpet tile, scrap rubber or carpet, to make their own home-made mats. Personally, the idea of lugging around a dirty old piece of carpet doesn’t appeal to me— I’d rather just draw a circle on the ground, in the traditional way. Or I could raid my grand-daughter’s college savings fund and purchase one of these tapis de pétanque— after all, they are washable.
Last week I tried to watch a petanque video on Youtube, but it was hopeless. You just couldn’t see the jack. It was a low-resolution video, the terrain was light-colored, and the black-colored jack was completely lost among shadows caused by irregularities in the terrain. Eventually I gave up.
Later I wondered what could have been done to make the jack more visible. Perhaps a different color. Or… perhaps… a larger jack!
There is no reason why the jack has to be the size that it is— 30mm ±1mm, as currently specified by the FIPJP rules. The size isn’t written in stone. Before 2008, the official size of the jack was 25mm to 35mm in diameter, which allowed for quite a lot of variability.
What if we played with a larger jack? For one thing, it would make televised matches easier to follow. And there would be another benefit— it would make the game easier for vision-impaired players. Last year one of our senior players began to experience the effects of age-related macular degeneration. Fortunately she was able to continue to play if we used our brightest-colored jack. But it occurs to me that we could help her even more by playing with a larger jack. Why not?
If you make your own jacks, it is easy to make a larger jack. Normally you would start with a wooden ball 1-1/4″ (30mm) in diameter. Instead, start with a wooden ball 1-3/4″ in diameter. The 1-3/4″ wooden balls that I ordered from amazon.com arrived in a package marked 1.7in | 44mm. The size seems good to me: bigger, but not too big. Here is a picture of the two sizes of wooden balls along with a 75mm boule.
I’m not saying that the FIPJP should change its rules about the size of the jack. (Although it would be sensible to provide competition organizers with a “large jack” option for televised games or games with a large stadium audience.) But I think that for friendly games with vision-impaired players, it would be quite reasonable to consider making and using larger jacks.
All of the wooden jacks produced in France (about a million each year) are manufactured by one small company, Monneret, which sells its jacks to large distributors such as Obut. Now Monneret is reporting that caterpillars (larvae) of the box tree moth (la pyrale du buis, which was first introduced to Europe from East Asia around 2007) are attacking and killing the trees from which wood is harvested to produce the jacks. Monneret’s company head predicts that in 5 to 7 years, all of the box trees in France will be gone. The company is attempting to stockpile box tree wood, and says that in the future it hopes to be able to import wood from other countries. Continue reading →
There are ladies and gentlemen out there who haven’t yet played petanque but are interested in learning it. Perhaps they saw it being played while they were on vacation in France, or they saw it in the movie A Year In Provence, and it looked fun. They’d like to buy some petanque boules and try it out.
If you are one of these wonderful people, I have two things to say to you. First: it really is fun! Second: What you find on amazon.com almost certainly is NOT what you want. That’s because if you want to play petanque—
Never buy a set of 8 balls. Buy only a set of 3 balls or 6 balls.
If you buy a set of 6 balls, make sure that it contains two sets of 3 balls each, not three sets of 2 balls.
The problem with buying boules on amazon.com is that almost every set of “bocce/petanque” balls breaks one of these rules. Beware of sets being sold as “bocce/petanque” balls. Continue reading →
A few petanque players in the USA brave the rigors of winter and continue to play with snow on the ground. Some of those players put their boules on some kind of device to warm them up. The moral of this post is that boules and heat do not mix. Continue reading →
Most players are familar with the requirement in Article 16(c) always to carry a boule towel in order to be able to remove (enlever) any mud or foreign substance clinging to a boule before throwing it. The rules, however, do not contain precise specifications for boule towels, so it is hardly surprising that the most frequently-asked questions about the rules of petanque are questions about the boule towel— What kind of fabric should it be made of? How big should it be? How should it be held and used?
Perhaps the most surprising thing about boule towels is that the usual English translation of the French word (chiffon) is “boule towel“. In fact, toweling material, thick and fuzzy, is completely unsuitable for use as a boule towel. It quickly picks up stray bits of leaves, twigs, and thorns and is almost impossible to clean. Instead, we recommend a fabric with a much smoother, harder texture— a patch cut from the leg of a worn-out pair of jeans does the job nicely.
There is no regulation size for a boule towel. A towel that is too small to do the job is obviously undesirable; a towel that is too large will be clumsy to use and carry. We have found that a rectangle of fabric approximately 29cm x 43cm (11.5″ x 17”) works well. A cloth table mat makes an excellent boule towel. Some so-called “experts” advise a player with a larger (or smaller) hand to use a larger (or smaller) towel. That’s rubbish, of course, since the relevant factor here is not the size of the hand but the size of the boule. A player who uses a larger (or smaller) size of boule should use a larger (or smaller) towel.
Finally, there is the question of how to carry and use the boule towel. Here, there are two basic requirements: one legal, the other practical. The boule towel must NOT be carried in such a way that it hides any boules that the player might also be carrying in the same hand. And, as a practical matter, the towel must be carried in a way that it can be conveniently used when needed, while not interfering with a player’s grip on any boule(s) that he may want to carry in the same hand.
The traditional provençal method of using the boule towel is to fold the long edge over the short edge, and then pinch the end of the towel into a small bunch,
The pinched end of the towel is then threaded through the fingers in the manner shown in the photograph (below).
When the hand is closed and holding a boule, the fingers naturally and effortlessly grip the towel firmly, and the tail of the towel falls cleanly away from the hand. When the towel is needed, the long loose tail can easily be folded up and over a boule in the hand in order to wipe the boule thoroughly. While doing this, it is easy to clean and dry the fingers and palm of the throwing hand by rubbing them vigorously with the cloth-covered boule.
Once you have found a boule towel that perfectly fits your hand and your playing style, you should treat it like what it is— a piece of personal hygiene equipment. Never lend your boule towel to another player; you don’t want to catch their cooties.
NOTEI am not a certified umpire. The opinions expressed in this post are solely my own and do not represent official rulings or rules interpretations of any organized petanque federation, national or otherwise.Posted April 1, 2017.
Some boules are made of stainless steel (inox). Some boules are made of carbon steel (acier au carbone). And some boules (especially inexpensive leisure boules) are made of carbon steel coated (revêtu) in chrome (chromé). The chrome makes the surface of the boules tougher and more resistant to rust (rouille). The problem is that the process of manufacturing chrome-plated boules uses Chromium 6, and Chromium 6 is highly toxic.
If you happen to find some rusty old boules, don’t throw them away. They can be restored to playable condition. Here is a La Franc SB carbon-steel boule that I accidentally left outside in the summer heat and rain. It is covered in a thick coat of orange rust. Click to view larger image.
This was not a disaster. A few minutes with a wire brush, and a few more minutes dragging the boule around on the ground to simulate a few days of play, and the boule was restored to playable condition. The boule on the left (see photo, below) is the restored boule. The boule on the right (from the same set) was kept out of the weather. The restored boule is darker in color and has a rougher surface (which I like), but otherwise the two boules are basically the same. Click to view larger image.
In this case, all I needed was a wire brush. If you have a boule for which that isn’t enough, then soak the boule in distilled white vinegar for a day or two. The acetic acid in the vinegar will soften the rust so that it can easily be scrubbed away. (If I’d used a vinegar soak first, I probably could have saved myself a lot of elbow grease with the wire brush.) Afterwards, remove the vinegar by thoroughly rinsing the boule with water, or with a weak solution of baking soda to neutralize the acetic acid.
A quicker solution is to use hydrochloric acid, which can easily be found (as muriatic acid) in stores that sell swimming-pool maintenance supplies. But I would recommend that only for extreme cases.
There are also products called rust converters that don’t remove rust, but chemically convert it to a hard, black, stable material called iron tannate. Rust converters are often used to restore and preserve iron-based historical artifacts such as old swords. For more information, Google (or search amazon.com or Youtube) for “rust converter“.
Note that it is also possible to use a short vinegar soak to blacken boules.
The moral of the story is that if you come across some rusty old boules, don’t write them off. They can be restored to playable condition. Depending on your taste, they may even be better than they were before they got rusty.
[updated 2021-01-10] Traditional leather scorekeeper
One traditional design for a pocket scorekeeper has two numbered wheels made of stiff leather sandwiched between a faceplate and a backplate, also made of stiff leather.
This American umpire’s scorekeeper for baseball (below) was manufactured in the 1870’s. At that time, the rules of baseball allowed nine balls and nine strikes, so the numbers on the two wheels go up to 9, and the wheels are labelled “balls” and “strikes”
The same two-wheel design is used in traditional petanque scorekeepers like this one from the French manufacturer Obut. The front plate identifies the two wheels as the scores for Nous and Eux — “us” and “them”. Numbers go from zero to 15 because international championships used to be played to 15.
The problem with this scorekeeper is that it is poorly made. The colored face is thin paper glued to the leather body— it quickly begins to peel away. The tightness of the screws is difficult to adjust, and if you drive around with the scorekeeper in your car, road vibrations will cause the screws to work loose and fall out.
Perhaps in response to these problems, around 2019 Obut abandoned this design and began selling a similar pocket scorekeeper made out of plastic. The new plastic ones seem to work much better than the old paper-and-leather ones. You can buy one of these from Petanque America.
I’m diabetic, and I use disposable insulin pens. To use an insulin pen, you twist the end of the pen— click, click, click— and dial in the number of units of insulin that you want to inject. When the pen is empty, you throw it away. I took three of these discarded pens, cut off the ends with the twist counter, and glued them together to make a pocket scorekeeper. The three-counter design is useful in cut-throat games, where you need to keep track of three players’ scores and games may be played to 21 or even 35 points.
Universal pocket scorekeeper
In 2006, Jill Barnes of Dublin, California (just east of San Francisco) was frustrated during her son’s baseball games. Either there wasn’t a scoreboard or the scoreboard wasn’t functioning. So she came up with a design for a simple universal pocket scorekeeper. It has a set of wheels for “us” and “them” (well, “me” and “you”). Its four independent numbered wheels can record scores of up to 99 for virtually any sport. It is available from Jill’s web site, www.pocketscorekeeper.com. Personally, I liked the rugged plastic construction and the straightforward simplicity of the design, but I found the wheels to be stiff and difficult to advance. I needed to use both hands to change the score.
Smartphone app
The requirements for a petanque scorekeeper app are quite simple. You need to be able to increase (and, in case of a mistake, decrease) the score of each of two teams. You need to be able to reset the scores to zero. And it might be nice to be able to count the number of menes played.
For Android, Pétanque: Marque Scores looks promising. It has a lot more features than just the basic ones I mentioned. Not surprisingly, it looks like it is the creation of a French software developer.
As pf 2016, when this post was originally written, Apple’s app store didn’t seem to have any good petanque scorekeeper apps. Two general-purpose scorekeeper apps that had good reviews were Swipe Scoreboard and Score Keeper HD Lite.
I’m beginning to suspect that most of the traditional advice on how to select boule size is bogus, and that many players may be playing with boules that are too big.
There is one question that all petanque players confront when purchasing competition boules — “What size should I purchase?”
There are two different schools of thought (theories, really) about how to select the size of boules.
The Role-based Theory is that “It depends on what kind of player you are. Small boules for pointers, because small boules make small targets for shooters. Big boules for shooters, because a bigger missile is more likely to hit its target.”
The Hand-size Theory is that “It depends on how big your hand is. Small boules for small hands. Big boules for big hands.”
There are problems with both of these schools of thought.
The Role-based Theory is useless for the average player. Beginning players aren’t yet skillful enough to classify themselves as pointers or shooters. Sometimes they will need to point, and sometimes they will need to shoot. The division of players into pointers, middle-men (millieux), and shooters really makes sense only for world-class players playing triples.
The idea that a boule is a more difficult target, or a more effective missile, because its radius is one millimeter less or more than some other boule… well, that’s just ludicrous. It’s like telling a Marine sniper to use a larger caliber bullet so he’ll have a better chance of hitting his target. Or telling a fat dictator that he needs to lose weight so he’ll present a small target for an assassin.
Most damaging to the theory, though, is the fact that the whole idea is questionable. A big wheel is better than a small wheel at rolling over lumps and bumps in its path. That’s why bicycles have bigger wheels than roller skates. So you’d think that a pointer would want to play with larger, not smaller, boules. Byron Putman reports that “Many club players contend that a pointer should use the largest boule that he can comfortably throw.” [Petanque, p. 103] Conversely, it would seem sensible for a shooter to prefer a smaller, not bigger, boule. One would think that being able to really wrap your fingers around a smaller boule would give a shooter more control over the boule.
You see the problem here. These ideas are just theories that somebody came up with because a priori they seemed to make sense. But completely opposite theories also make sense. They are all just theories. They have no basis in actual facts. That’s what makes them bogus. As Byron Putman says, “Be skeptical of most club-level boule selection advice… because it is often based on urban myth and contradictory inferences.”
In contrast to the Role-based Theory, the Hand-size Theory seems practical and sensible. There is obviously a relationship between the size of a hand and the size of a boule that will fit comfortably into that hand. So the slogan “Small boules for small hands; big boules for big hands,” seems to make sense.
The problem lies in the practical application of the theory. Boules manufacturers have tried to create formulas based on this idea (“a player with hand-size X should use boules of size Y”). But the numbers in their formulas are questionable, if not downright bogus.
The first sign that something is fishy is the fact that different boules manufacturers offer different ways to measure your hand. In theory, if there was a specific feature of a hand that made a boule more or less suitable for that hand (the length of the fingers, for instance) then everybody would know that, and all boules manufacturers would ask for the same hand measurement. But they don’t. Some measure the length of the middle finger from the hand to the finger tip. Some measure the distance from the base of the hand (the wrist) to the finger tip. Others measure the distance from the tip of the thumb to the tip of the middle finger. (Read our post on the various methods.) There is, in short, no standard formula for measuring hand size. Nobody really knows what should count as “a small hand” or “a big hand” for the purpose of picking boules.
You encounter the second bit of fishy business when (having measured your hand) you consult a manufacturer’s table that maps boule size to hand size. Suppose you measure your hand and get a measurement of X centimeters. And suppose that the table says that someone with that hand size should play with a boule of 74mm. But where did they get that number of 74mm? Could that number be wrong? With a hand size of X cm, perhaps you should be playing with a 71mm or 72mm or 75mm or 76mm boule. How do we — or they — know what size boule a person with an X-centimeter hand should use?
Steve Ferg (left, USA) and friend Daniel Duflot (right, France). Steve plays with a 74mm boule. Daniel uses a 75mm boule.
This brings us to the question of how much the choice of boule size is determined by anatomy, and how much it is determined by culture.
In the USA, a boule size of 73 mm seems to be the average for men, with smaller sizes such as 71 mm being popular with women. In France on the other hand, the most common diameters for men are 74–75 mm, and for women 72–73 mm.
Generic Chinese leisure boules of the kind that you might buy from Petanque America are about 73 mm, but Obut (French) leisure boules are 74 mm.
Since French players are probably on average smaller than American players, why are they using bigger boules?
And if French players prefer larger boules than Americans, and French boule manufacturers design their size-selection guidelines with their largest market (French players) in mind, then the size-selection guidelines provided by French manufacturers will tell Americans to buy boules that are too large. So why should American players follow the advice of French manufacturers?
When I used the hand charts, they said that I should play with a big boule — 76mm. Despite my gut feeling that that was too large, I went ahead and bought 76mm boules. Why?
Partly, it was because I was new at the game, I knew that I didn’t know much and I assumed that the boule manufacturers knew their business. As an ignorant newbie, I accepted established authority.
Partly, there was some stupid macho bullshit rattling around in my brain — the kind that equates “big” with “strong” and “manly”. And the fact that I actually am a tall guy helped me not to recognize the macho bullshit for the bullshit that it was.
But the strongest reason was the Role-based Theory. I wanted, some day, to become a really good petanque player, i.e. a shooter. So, I reasoned, I should buy shooter’s boules — big boules. The Role-based Theory led me, an aspiring shooter, into playing with boules that were too big.
I suspect the same kinds of things happen to other players.
Do shooters really play with bigger boules? Not any more. ▲
On Youtube, there is an interesting video of a clinic that Claudy Weibel gave at the 2012 Petanque America Open. After the clinic, during the question-and-answer period, one gentleman asks Claudy “When do you know that the boule is too big for a shooter? Because when we shoot, we like big boules, but what is too big?” And a bit later in the video we can see him with a boule in his hand, and it looks too big. It is pretty clear that he has been playing with, and having trouble with, a boule that is too large for his hand, and that he’s been doing it because of the tradition that shooters play with big boules.
Claudy’s answer is interesting. You can watch the video on YouTube, and I have made a transcript of the conversation (below). Note that Jean-Pierre Subrenat (president of the New York Petanque Club, and a very strong player in his own right) is translating for Claudy, and sometimes he offers his own thoughts as well as Claudy’s. The conversation begins at 12:15.
QUESTION:
When do you know that the boule is too big for a shooter? Because when we shoot we like big boules, but what is too big?
ANSWER:
It’s totally the contrary. Me [Claudy], I play 73. I [Jean-Pierre] used to play 75. Now I play 72.
A shooter doesn’t have to have big boules to shoot. On the contrary, you have to control the boule in your hand. [When you play with a smaller boule,] when you release the boule, you release it better, you can control it better with your fingers.
[Jean-Pierre, talking to the student:] I think this boule is too big for you, just by looking at your hand.
[They examine the boules. The student says that he thinks his boule is 76 or 77. Claudy compares his hand to the student’s hand. The hand sizes look to be about the same. Claudy says that he plays with a 73. The implication, of course, is that the student is probably playing with a boule that is about 3mm too big for him.]
I [Jean-Pierre] was playing 75, then with my team we got sponsored by KTK, the brand, and when they gave me the boules, I said I want 75. They said no, all the big players are playing with smaller and smaller boules. Quintais plays with 71. 71! And he’s bigger than you!
Yeah, the smaller… And that is a trend that is new. When you think that Quintais plays with boules that are smaller than my 72, its amazing, the results that he has.
When you point, you can control the smaller boule ten times better. All these years, I went from 75 to 72. I cannot play now with 75, at least not any more, at least not decently.
Dylan [Rocher] plays with 73. Marco [Foyot] plays with 74. Damien [Hureau] plays with 73.
QUESTION: So it’s a trend then?
ANSWER: It’s a trend. It’s the results… you see the results!
At the very end of the video Claudy makes some remarks in French that Pierre does not translate. I think I hear “It is important to have a good grip on the boule in the hand (bonne tenue en la main).” And later, something about “leaving the hand well (bien sortir en main).”
The bottom line is that Claudy and Jean-Pierre think that the old orthodoxy of “big boules for shooters” is dying. The new thinking is “Not too big. You can control a smaller boule better.”
I recently discovered more support for this idea. On August 16, 2014, there was an interesting post on one of the forums of the petanque710 web site. Its subject was diameter of the boules of shooters (Diamètre des boules des tireurs). Here is my rather free translation of the post.
When I started playing petanque I noticed that the majority of the players, and especially shooters, played with boules of 75 or 76 mm in diameter, with 75mm being the most used. But now I notice that small diameters (72-74) are being used, with diameters of 75 and 76 now being quite rare in games. And even more surprising, many of the great shooters are playing with the small diameters.
So I decided to make a list of the diameters and also the weights of the boules that the great players are now using. If you find any errors in my list, you can correct them and add other names to the list.
74 – 700 – Foyot
74 – 700 – Miléi
74 – 690 – Quintais
74 – 680 – W Chapeland
74 – 680 – Fred Michel
73 – 690 – Weibel
73 – 690 – Savin
73 – 690 – J L Devernois
73 – 690 – Gasparini
72 – 680 – Dylan Rocher
73 – 680 – S Chapeland
73 – 680 – J Darodès
73 – 680 – Dufeu
73 – 680 – D Olmos
72 – 700 – Suchaud
72 – 680 – Maillard
72 – 680 – Leboursicaud
71 – ??? – Christian Fazzino
71 – 700 – Gross
71 – 680 – A Papon
The result, as you can see, is something that might seem strange. Almost all of the top female and male shooters in the world play with 71 and 72mm — the smallest diameter.
The original post (which has now been taken down) reported Marco Foyot playing with 76 and Dylan Rocher with 72. I've changed their information based on Jean-Pierre Subrenat's comments, which I consider more reliable because I know that he has personally played against Marco and Dylan. I've left other contradictions unchanged (e.g. the list reports Quintais as playing with 74, but Jean-Pierre reports him as playing with 71). Note also that the closing remark that the top shooters play with 71 and 72 is contradicted by the list information. According to the list, most are using 73, with about an equal number split between 74 and 72/71.
What happens when you play with boules that are too big? ▲
There seem to be two consequences of throwing boules that are too big. One is accuracy issues, and the other is forearm fatigue and soreness. These problems occur with notable regularity among women players, who as a group have smaller hands than male players.
Byron Putman, in his book Petanque, notes that many players compensate for throwing oversized boules by unconsciously pulling their fingers apart. There may also be undesired thumb friction. The result is that players throwing oversized boules often have chronic issues with undesired sidespin (causing non-linear rollout) and release hang-ups (which can cause difficulties in controlling the distance of a throw). [pp. 75-77]
In addition, a larger (or heavier) boule requires a greater gripping force. The player must squeeze the boule harder in order to hold it. The squeezing tightens the forearm flexor muscles, producing forearm fatigue and soreness. I’ve had a friend — a small lady player — tell me that she experiences forearm soreness. And Carl Herbert, of the Seattle Petanque Club, reported the same thing in a recent email exchange.
Yes, I believe you are correct that Americans use bad advice for selection of boules. After six months of playing daily with boules that caused my forearm to ache, I tried using smaller boules and found I shoot more accurately with them. I suspect I point better with smaller boules as well… I play mostly with a set of 71mm 650g boules now, and I like them very much.
The obvious solution to the problems of boules that are too big, is to play with smaller boules. Byron Putman found this to be especially true for the women players in his group. [Petanque, pp. 104-5]
The minimum certified boule size is 70.5mm. According to the boule sizing chart a 71mm boule equates to the hand measurement between 170mm and 180mm. I’ve measured the hands of over 50 women with a variety of heights and bone structures. The average thumb to middle finger span is about 163mm which, according to most sizing charts, would specify a 69mm boule!
Putman tells the story of a female friend with a very small hand who suffered “chronic release issues” while using 71mm, 680g boules. Her release issues vanished when she switched to “competition junior” boules of 70.5mm, 650g.
Even 1/2mm and 30g can make a huge difference to a player with petite paws… Of the 12 regular women players in my summer group, eight of them throw [compet. juniors] — and they absolutely love them!
During my email conversation with Carl Herbert, he wrote
I think there is better advice to give newcomers than what I got myself. I feel strongly clubs should provide a range of boules for new players, especially smaller sizes. Many clubs provide only the 73mm Chinese-made boules or the 74mm Obut leisure boules for lending to beginners, and I think that is a grievous error. They start out hindered even before they know how to play the game.
I see a lot of new players buy Obut leisure boules because they are relatively inexpensive, but many women who start with such large-diameter boules have trouble with them. B.W. Putman mentions in his book that women in his area who play with junior boules (70.5mm, 650 to 670 grams) like them and play well with them. I like them too! I have yet to hear a reasoned explanation why anybody can’t play with smaller, lighter boules to good effect. Indeed, my experience has been that I generally play better with them.
Perhaps I will experiment again with larger-diameter boules in the future, but I expect I will always find smaller-diameter boules more precise. One reason is that boules with a relatively smaller fit within my hand permit me greater variation in my grip. The tactile variability of the boule in my hand allows me better consistency in how I grip it. I have a better feel for minor differences of my grip.
I started with my 71mm, 650-gram boules this past January after having played with 72mm boules for a few months. I had played with a set of junior boules during a visit to California, and I liked them very much. My benefit was immediate and considerable.
I suggest new players are better off starting with boules in the 70.5mm to 72mm range unless they have very large hands. Even then there’s no reason they can’t play the small boules for a while. I suggest it is better to start small and move gradually to larger sizes than it is to use the various selection guides to guess compromising sizes to suit an ideal skill level that players may attain in the future. The latter approach probably costs a player more money and accumulates more steel boules in their closets.
I can certainly identify with that last sentence. I have several sets of 76mm boules that are going up for sale on eBay one of these days.
In summary… There are good reasons to suspect that the traditional advice about boule size tends to steer players toward selecting and playing with boules that are too large. If you are having consistency or accuracy issues with your throwing, or are experiencing tiredness or soreness in your forearm, you should probably consider experimenting with a smaller size of boule.
▲
Many players carry smart phones and they are naturally interested in using a smartphone app for measuring. An umpire won’t use a smartphone app in an FIPJP-sanctioned competition, but of course you can use one in friendly games. (See also our post on Measuring boule to jack.)
There are several questions that can be asked about any measuring technology.
How quickly can a measurement be made?
How likely are you to accidentally move a boule or jack when using it?
How accurate is it?
How easy is it to use?
How expensive is it? How much does it cost?
For players that already own a smartphone, the cost of an app is essentially zero. For players with knee, back, eyesight, or stability issues, a smartphone can let you measure without squatting or getting down on your knees. And of course an app can make measurements quickly with no risk of touching or moving boules or jack. This leaves only the issue of accuracy. In general, the newer apps seem to be much more accurate than they were a few years ago. Still, our recommendation is to test an app before you trust it. For a while, measure with the app AND an umpires ruler, and compare the results.
To find an app, you can simply Google smartphone measuring app petanque. A few petanque measuring apps that we think might be worth considering are—
Booble (iOS and Android) (free) gives you the distances in numbers and tells you which boule is closest and the next and next etc. There is a neat short video showing how it works HERE.
Tape Measure for Pétanque (iOS and Android) shows circles and numbers the boules sequentially by distance from the jack. It can be set up so that it automatically takes a picture when the phone is completely level. Tape Measure for Pétanque is the personal choice of one of our players, and it seems to be precise and accurate— every time that I have doubted it, and measured with my umpires ruler, it was correct.
Share your experiences
If you’ve been using a smartphone app, and have something useful to say about it, leave us a comment (below) and share your experiences. Other players that are looking at this new technology will be interested.
In Washington DC, in January, when you get out there on the piste in 40-degree weather, those metal boules can get pretty cold.
My first impulse of course was to pull on my gloves. But there were problems with the gloves. They were nylon ski gloves. They were warm enough all right, but they were bulky. Between the thick insulation and the slippery nylon surface of the glove, I had no grip or feel for the boule; I couldn’t control it. It was hard pulling the gloves on and off, so I finally ended up playing bare-handed, despite the cold, stuffing my hands into my pockets when I could.
The other day I saw a friend wearing some unusual gloves, and then later the same day I found them in an appliance fix-it shop. (You can probably find them in a gardening shop or a hardware store.) So I bought them and thought I’d give them a try. They cost $5.
The gloves are Magid ROC40T-L The ROC Rayon Made from Bamboo Collection Nitrile Gloves, Mens Large by Magid Glove. I also found them at amazon.com They are basically a sort of light cottony glove (I guess technically the are not cotton, but some sort of rayon made from bamboo.) They are not bulky at all, and they are slightly elastic, so they fit snugly but comfortably over your hand. Your impression is of a very thin glove — just the opposite of a bulky ski glove.
The palms and insides of the fingers are coated with some black substance (I guess it is called “nitrile”). It is flexible and sort of rubbery, with a surface that is not sticky, but not slippery either. With this kind of surface, I think you could actually get a good grip on a boule, with decent feeling. The reviewers of the glove say things like
These gloves are good for light to medium duty jobs that require more ability to use fingers.
These gloves work great for jobs where you need some “feel” for the work and a sensitive grip, like pulling weeds or picking up pine cones and small brush.
The gloves are meant to be light work gloves. The reviews mentioned that they aren’t very sturdy. But I figure that that shouldn’t matter if I’m going to be using them only for petanque.
So I bought a pair.
They are not very warm — they weren’t designed for warmth. But they are warm enough — the nitrile coating does indeed take the edge off of the temperature of a freezing boule.
The gloves don’t breathe; the nitrile coating traps perspiration. But my hands aren’t perspiring very much — they are cold. That’s why I’m wearing gloves in the first place.
Best of all, after a frame or two, I’m just playing normally. I’ve completely forgot that I’m wearing gloves.
updated 2023-02-25
Determining which boule is closest to the jack is at the heart of petanque. There are a number of different ways to do it. [See also our post on Buying measuring tools.]
(1) VISUAL INSPECTION (aka “eye-balling”) Visual inspection is the technique of first resort. The trick to being able to tell which of two boules is closer to the jack lies in where you stand. Don’t stand directly over the boules, looking down on them. Stand back from the boules a meter or more, so that you are the same distance from each of the boules. Look across the boules at the jack. Imagine a line between the boules, and imagine a second line extending out from center of that line. You will probably be able to see that the jack falls on one side of that second line; that is, you will probably be able to see that the jack is closer to one of the boules than the other.
Visual inspection is fast and there is no danger of accidentally touching and moving anything. But it is not precise. When two boules are almost the same distance from the jack, it may not be possible to tell which is closer. Sometimes if you look across the boules to the jack, one boule looks closer… but if you walk around to the other side and look across the jack to the boules, the other boule looks closer. That is when you need to remember the old adage— “When in doubt, measure.”
(2) COMPARISON
In comparison we use some physical object whose length can be adjusted to compare the distances between the boules and the jack. Various objects can be used to make the comparison. The traditional Provençal method is to hold two sticks together, as in the photo below. A telescoping metal rod like an old radio antenna or a pointer will also do the job nicely.
Chopstick calipers – a modern version of a traditional Provençal technique
Another traditional technique is to use a piece of string, as in the picture below. It is not a reliable technique. It is amazing how much the string mysteriously stretches depending on whose boules are being measured. Thanks to the Brighton-Hove Petanque Club and Pen-Y-Coed Petanque for several of the following photos.
One of the best comparison tools is a folding rule with an extensible end piece, commonly called an umpires rule. The photo below shows the correct way to hold the rule, with the butt against the boule and the slider extension toward the jack. NOTE that the rule is held with the unmarked side and the slider-control button facing upward. That way it is easy to use your left thumb to use the slider-control button to slide the extension in and out.
There is a trick to using an umpires rule. Do NOT position the rule between the boule and jack and then slowly push the extension toward the jack. If you do that, you may accidentally push the extension too far and touch and move the jack. Instead, hold the end of the rule ABOVE the jack while you are adjusting the extension, and then slowly lower the end of the rule down toward the jack. If you see that you are too long or too short, then lift the rule up again, adjust its length, and then again lower it down toward the jack. Repeat this process until you are satisfied with the measurement.
There is a kind of tape measure that is popular among bocce players; it is designed to be used as a comparison tool. Ignore the numbers on the tape. Extend it between the boule and jack, and lock it.
In petanque we measure the shortest distance between two objects. That means that if the objects are very close together and of greatly differing sizes (like a jack and a boule), the shortest distance is “tilted”.
When the distance is short and the plane of measurement is tilted in this way, you need to use a set of calipers.
Some tape measures have a small built-in set of calipers.
A folding rule can be used as a calipers.
(3) MEASUREMENT
Comparison isn’t practical for longer distances. For longer distances, we need to measure, that is, to measure the distances between the jack and the relevant boules, and then compare the measurements. Measurement involves assigning numeric values to distances, which comparison does not.
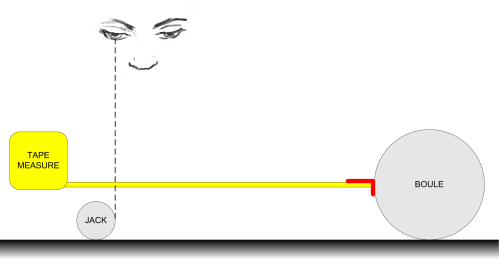
The most common tool for measuring is a retractable steel tape measure. (See our page on buying measuring tools.) The proper way to use a tape is to measure across the top of the jack to the boule. Make sure that the end of the tape is positioned at the middle of the boule; if it it too high or too low, the measurement won’t be accurate. Keep the tape above the jack, without touching it. Look straight down at the jack, and measure to the edge (not the top) of the jack.
Measurement requires strong legs, steady hands, and good eyes. It is difficult to do. It requires squatting or kneeling and holding the tape measure steady, with two different parts of the tape microscopically close to boule and jack, then reading the numbers on the tape to the precision of one millimeter while avoiding distortions due to parallax. And of course, it creates a danger of bumping and moving the boule or the jack.
If the distance is long, get a friend to hold the end of the tape against the boule.
(4) DEVICE-ASSISTED VISUAL INSPECTION
Le Juge
The first step along the path to device-assisted visual inspection took place around the year 2000 with a device called Le Juge (the Judge). It was a circular plastic lens with concentric lines painted on it. You centered the view on the jack, and (in theory) the concentric rings made it easy to determine the relative distances of the boules. Le Juge didn’t actually work very well, but the basic idea was quickly adapted for smartphone cameras.
There are a number of smartphone apps that work basically the same way that Le Juge worked. (See our post on smartphone apps for measuring.) The idea of smartphone-assisted visual inspection is extremely attractive. There is no risk of touching and moving boules or jack. You don’t need to squat or get down on your knees. Smartphones, now, are virtually ubiquitous. One issue is that, now, there are many different smartphone apps and they vary widely in reliability, accuracy, and ease of use.
Another device for visual inspection is a “laser tape measure”. These devices are widely used in construction, but as devices for making petanque measurements they are clumsy. A laser beam can’t see though intervening boules or through rocks or bumps on the terrain. And a laser tape measure is expensive compared to a old-fashioned tape measure.
SOME FINER POINTS
Before we end, we should mention a couple of the finer points of the art of measuring.
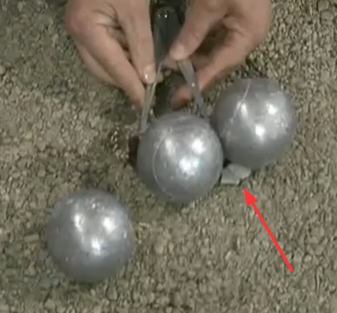
When the distances are close and an umpire wants to make sure that nothing is disturbed during the measuring, he/she can place wedges under boules. In this YouTube video we can see the umpire placing wedges and then measuring with calipers. In the video the jack is hidden behind the center boule and she is measuring the “second” boules to determine whether the winning team scored one point or two.
Another standard item in an umpire’s toolkit is a set of feeler gauges, the kind that you would use when gapping spark plugs. An umpire will use them when there is daylight between boule and jack but they are so close that you can’t fit a calipers between them.
Rather than declaring two boules to be equidistant from the jack, an umpire will resort to feeler gauges in an attempt to find that one boule is closer to the jack than the other. This makes ordinary players in friendly games wonder how precise their own measurements should be. My advice is— don’t be afraid to declare that two boules are equidistant from the jack. If both teams measure, and neither team is sure that one boule beats the other, then let it be. Agree that the boules are equidistant, the point is null, and carry on with the game.
FURTHER READING
“Measuring distance between boules and the cochonnet” by former Southern Counties Petanque Association Regional Umpire Richard Powell is available HERE.
The Petanque New Zealand “Umpire’s Training Manual” (2019) is available HERE.
Surfing the web, I could not find anywhere a set of instructions for how to install sideboards and boundary strings around a petanque piste (lane). So I wrote this one. Note that these instructions are for the traditional petanque method, which involves driving nails into the ground.
updated 2021-09-19
Installing wooden sideboards (arrêtoirs de boules)
Driving nails into the ground may seem strange to Americans, but it is the traditional petanque method. When you’re laying out a petanque lane, you drive nails into the ground to hold boundary strings and wooden sideboards (wooden surrounds) in place.
Here is a nice example— a postcard showing Fanny. Note that the sideboards are being held in place by big nails.
Although nails are the traditional fastener for sideboards, a popular modern alternative is rebar and safety caps.
Installing boundary strings
To install boundary strings, you will need a roll of nylon string and some nails. Four- or five-inch (10-12cm) nails should do the job. (This photo actually shows seven-inch nails.)
You’ll also need a long tape measure (for laying out the desired dimensions of the lane), a pocket knife or a pair of scissors (for cutting the string), a hammer (for driving nails into the ground), and a pair of pliers (for pulling nails out of the ground).
The basic technique for securing one end of a boundary string is to drive a nail part-way into the ground, leaving about one inch (3cm) exposed. Pull the string taut. Wind the end of the string around the nail four or five times. Then pound the nail all the way into the ground until the head of the nail is flush with the surface of the ground, or a little below it. (Pressure from the surrounding dirt will hold the string in place; it will not unwind.) Trim the end of the string, but leave a short, loose tail. (The tail won’t hurt anything, and it may help later, if you need to find the nail again, or to pull it up.)
Strings don’t last forever. Over time, exposure to the elements and being stepped on by players will damage a string until it breaks or goes slack. When that happens, it is easy to pull up the nails in order to replace or tighten the string. Brush away the dirt that has accumulated above the nail, exposing the head of the nail. Using a pair of pliers, grab the head of the nail. (An ordinary pair of pliers will do the job, but a big pair of pliers, or a pair of locking pliers, will do it even better.) Using the pliers, twist and pull. The nail should come out easily.
How to lay out the strings
Don’t install four nails (one at each corner of the lane) and then run the string all the way around the lane. If you do that, then when the string breaks the strings on the other three sides of the terrain may go slack, and you will need to restring all four sides of the lane.
Instead, install four separate strings, one for each side of the lane. This keeps the nails away from the dead-ball line, and (if the nails are installed close to the wooden sideboards) the nails are out of the way of the players.


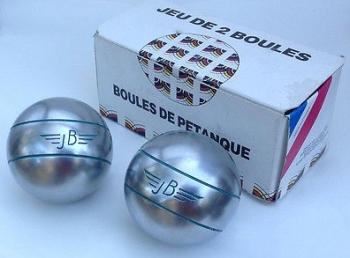 Note that manufacturers often sell both competition boules and leisure boules, so the name of a reputable French manufacturer does not mean that the boules are competition boules. If the packaging does not display the FIPJP logo and the “certified” label, the boules are not competition boules. These classic JB boules look great… but they are not competition boules.


 It is manufactured by a Franch company, Tapis de Pétanque (
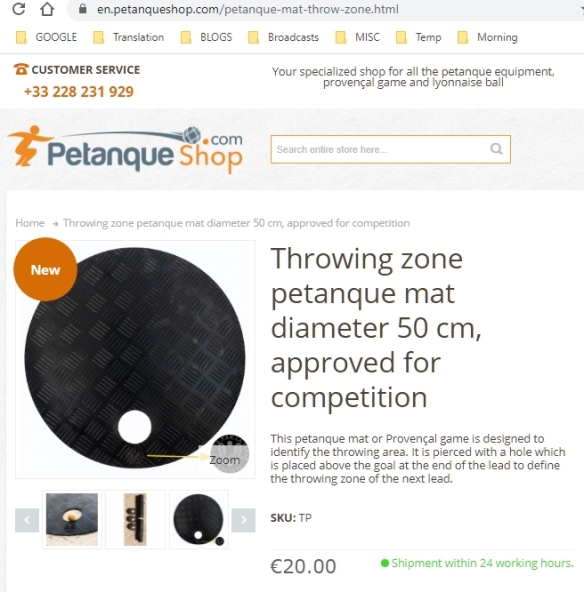


 The first sign that something is fishy is the fact that different boules manufacturers offer different ways to measure your hand. In theory, if there was a specific feature of a hand that made a boule more or less suitable for that hand (the length of the fingers, for instance) then everybody would know that, and all boules manufacturers would ask for the same hand measurement. But they don’t. Some measure the length of the middle finger from the hand to the finger tip. Some measure the distance from the base of the hand (the wrist) to the finger tip. Others measure the distance from the tip of the thumb to the tip of the middle finger. (


 There seem to be two consequences of throwing boules that are too big. One is accuracy issues, and the other is forearm fatigue and soreness. These problems occur with notable regularity among women players, who as a group have smaller hands than male players.


 Driving nails into the ground may seem strange to Americans, but it is the traditional petanque method. When you’re laying out a petanque lane, you drive nails into the ground to hold boundary strings and wooden sideboards (wooden surrounds) in place.
 Here is a nice example— a postcard showing
  Although nails are the traditional fastener for sideboards, a popular modern alternative is


